If you’re looking to add a bit of extra texture or simply cover up some imperfections in your walls, plastering is a great option. Plastering is relatively easy to do and doesn’t require any expensive materials or tools.
How To Plaster A Wall?
Is Plastering A Wall Difficult?
The majority of people delegate plastering to professionals. On the other hand, plastering a wall is entirely possible if you plan and adhere to a tried-and-true method. The finished product will be a smooth, paintable, or wallpapered wall.
Materials Required To Plaster A Wall
Due to the length of time required to plaster a wall, it is critical to select high-quality tools that feel good in your hands. The complete list of required tools is located at the top of this page, but here are the five most critical ones:
- Use a stainless steel trowel with a comfortable, evenly weighted handle for plastering.
- The plaster is held in place with a plasterer’s hawk board. Although both plastic and wooden hawk boards can be used, the plastic hawk board is more convenient due to its lighter weight. A wooden hawk board, on the other hand, is far more durable.
- Bucket trowel – This tool is designed to simplify the process of scooping plaster from the bucket to your hawk board.
- While mixing the plaster by hand is acceptable, it is much easier and faster to use a power mixer. It’s especially helpful when working with large batches of plaster that need to be applied quickly.
- Keeping your edges clean and applying water to your plaster will require the use of a high-quality paintbrush.
If you intend to reuse plastering tools, ensure that they are thoroughly cleaned and free of any plaster residue from previous jobs.
Preparing The Wall For Plastering
Step 1
Because plastering is a messy job, having a clean, unobstructed work area is critical. Remove all furniture and curtain rails, dado rails, and, depending on the job, radiators from the room. Tape any exposed sockets to prevent the plaster from entering.
The floor should be covered with heavy-duty protective sheets. If you are removing old plaster, you will require two sets of sheets: one to remove the old plaster and another to apply the new plaster. Otherwise, you risk contaminating your new plaster with dust.
Scrubbing and thoroughly cleaning the wall removes all wallpaper, loose plaster, grease, and dust. This is critical because any debris left on the wall will obstruct the plaster’s adhesion.
Apply plaster tape to all joints between sheets if you are working with new plasterboard. Once the tape is in place, trim it to a clean edge with a sharp knife.
Step 2
The next step is to apply PVA glue to the wall, which is required to secure the plaster. Before applying the PVA, dilute it according to the manufacturer’s instructions. Typically, a 1:4 ratio of glue to water is used. Utilize a roller or a brush to apply the glue to the wall. Ensure that the glue is completely dry before proceeding. You can begin applying the plaster once it becomes slightly sticky (or “tacky”) to the touch.
How Should The Plaster Mixture Be Prepared?

Step 1
When mixing plaster, always follow the manufacturer’s instructions. Fill a clean bucket halfway with clean tap water and gradually add the plaster to avoid contamination. This aids in the prevention of the mixture becoming lumpy and uneven.
Step 2
To mix in any dry plaster around the edge of the bucket, use a bucket trowel.
Step 3
To mix the plaster, either a hand mixer or a power mixer can be used. A power mixer is better suited for larger jobs requiring the application of a large amount of plaster in a short period. Reduce the speed of the power mixer to low to avoid overworking the mixture. Continue stirring until the mixture is smooth and lump-free, resembling “thick custard.”
Step 4
Once the plaster has been thoroughly mixed, clean the power stirrer to prevent the plaster from adhering to the blades.
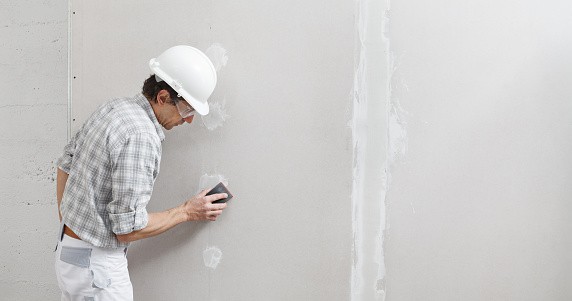
Techniques Used To Apply The Plaster
Step 1
Pour your plaster onto a spot board first if you’re plastering a large area. The mixture should spread evenly across the board but not run. Remove a section of plaster with a bucket trowel and transfer it to your hawk board. If you are unfamiliar with handling the hawk, begin with a small amount.
Step 2
Applying plaster to a wall is as simple as following these steps:
- Remove a small amount of plaster from the hawk board with the plastering trowel. Use an upward stroke with the trowel angled slightly away from the wall to spread the plaster firmly on the wall.
- At the end of each stroke, flatten the trowel to smooth the plaster.
- Work your way up and outwards from the bottom left corner of the wall, using a small amount of plaster each time.
- To begin, use brief sweeps followed by longer sweeps to even out the surface.
- Continue along the wall in this manner until the plaster is evenly distributed.
Step 3
Turn off the electricity and tape the light socket if you’re going to plaster around it.
Step 4
Allow approximately 20 minutes for the first coat of plaster to dry. After that, smooth out any bumps in the plaster with a trowel. Spray sections of the plaster with water if necessary. As a result, the plaster will adhere to the trowel more readily. Remember to use a wet brush to even out the corners and edges.
To apply a second coat of plaster, repeat the previous steps. The primary difference between the second and third coats is that the second coat must be significantly smoother and more even than the third coat. The second coat of plaster should be slightly thinner – for best results, follow the manufacturer’s instructions.
Step 5
Allow for a slight drying period, as directed by the manufacturer. The surface should be slightly damp but firm enough to resist movement when touched.
Methods Used To Finish The Plaster
Step 1
After the plaster has dried to the desired consistency, you must polish your work. Use a clean trowel blade to lightly go over the surface, dampening it with a spray bottle as you go. Slightly angle the blade to the side to re-smooth the edge over the plaster.
Step 2
Polish the edges and corners with a small damp brush.
Once completely dry, the plaster can be painted or wallpapered. Seal any unused plaster bags, but keep in mind that the plaster mix is only good for a few weeks.
Final Thoughts
Now you know how to plaster a wall! This is a job that can be done by most people with little practice. The main thing is to take your time, read the manufacturer’s instructions and enjoy the process.
If you have any tips on how to plaster a wall, please share them in the comments below.
Related Posts: